
Floor underlayment often lurks beneath the surface, but it’s a critical component of any flooring project. It provides stability, insulation, and moisture protection, ensuring your floors remain beautiful and functional for years. In this extensive guide, we’ll dive deep into the world of floor underlayment, offering you a comprehensive step-by-step walkthrough for a successful installation.
Understanding Floor Underlayment
Floor underlayment is often the unsung hero of flooring projects. It is a vital layer of material that resides between your subfloor and the final flooring. Its multifaceted purpose extends beyond mere support, offering a smooth and level surface that acts as a canvas for your chosen flooring. Additionally, it provides a suite of benefits, including sound insulation, moisture protection, and temperature regulation.
When it comes to which flooring types require underlayment, the answer isn’t one-size-fits-all. Some floorings can stand alone, but others thrive with underlayment support. We’ll delve into the specifics of which flooring types typically necessitate it and why it’s pivotal to your project. Whether you’re planning to install luxurious hardwood, resilient laminate, versatile vinyl, or elegant tile, comprehending the role of underlayment is fundamental to achieving a lasting, high-quality result.
Tools and Materials
Before embarking on your underlayment installation journey, gathering the right tools and materials is paramount. Your toolkit should include measuring tape for precision, utility knives for clean cuts, adhesive for secure bonding, and sheets that match your project’s requirements. We’ll provide a comprehensive checklist to ensure you’re well-equipped to tackle the task ahead.
Safety should be a paramount concern in any DIY project. Equipping yourself with the necessary safety equipment, such as safety glasses and gloves, is essential. We’ll also outline vital precautions to take during the installation process, including proper ventilation when working with adhesives. Ensuring a safe workspace is not only crucial for your well-being but also pivotal to achieving a successful outcome which professional floor underlayment contractors would tell you first.
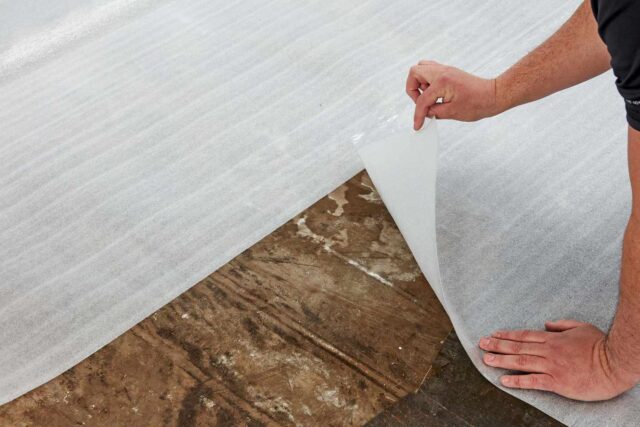
Preparing the Subfloor
A clean and level subfloor forms the sturdy foundation upon which your underlayment and final flooring will rest. Its significance cannot be overstated, as meticulous subfloor preparation directly impacts the longevity and performance of your flooring project. We’ll expound on why this step is pivotal to your endeavor and how it sets the stage for a seamless installation.
Inspecting your subfloor is the first order of business. You’ll learn how to meticulously assess it for any damage, irregularities, or imperfections that might impede the underlayment’s effectiveness. We’ll also provide insights into how to address these issues effectively, ensuring that your subfloor is primed and ready for the subsequent installation. A well-prepared subfloor is the bedrock of a successful project.
Choosing the Right Underlayment
Underlayment materials come in an array of forms, including plywood, cement board, foam, and more. Each material boasts unique characteristics and applications, making the selection process crucial. We’ll take an in-depth look at these materials, providing you with a comprehensive understanding to make an informed decision based on your specific flooring needs.
Selecting the appropriate material tailored to your chosen flooring type is critical for a successful installation. Our guidance will help you navigate this decision-making process, considering factors such as moisture resistance, insulation requirements, and structural support. A well-matched material ensures that your flooring project stands the test of time and performs at its best.
Measuring and Cutting Underlayment
Precise measurements and clean cuts are the cornerstones of a successful underlayment installation. We’ll guide you step by step through the process of measuring and cutting underlayment sheets, ensuring they fit your space flawlessly. Whether you’re working in a small, cozy room or a sprawling area, our instructions will help you achieve accuracy and precision.
Cutting underlayment materials can be a daunting task, particularly in irregularly shaped rooms. We’ll share techniques, tricks, and tips to guarantee your cuts are clean and precise, irrespective of the room’s unique configuration. This level of precision ensures that your project seamlessly conforms to your space, setting the stage for a flawless flooring installation.
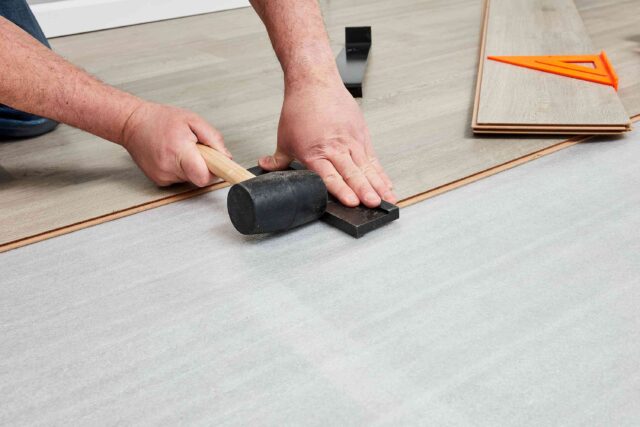
Installing Underlayment on Wood Subfloors
For wood subfloors, a secure attachment of underlayment is crucial. We’ll delve into the detailed process, providing guidance on proper spacing, selecting suitable fasteners, and employing adhesive effectively. The goal is to create a stable and reliable foundation that can withstand the test of time, supporting your final flooring flawlessly.
Installing Underlayment on Concrete Subfloors
Concrete subfloors present unique challenges and considerations. We’ll explain the intricate process of installing underlayment on concrete surfaces. This includes addressing critical topics such as moisture barriers to prevent unwanted moisture from seeping into your flooring and ensuring the correct application of adhesive for a strong bond between the underlayment and the concrete.
Overlapping and Sealing Seams

To safeguard against moisture infiltration and create a truly seamless underlayment layer, correctly overlapping and sealing seams is paramount. We’ll emphasize the importance of this step and provide detailed, step-by-step instructions on how to achieve it. Properly sealed seams not only enhance moisture protection but also contribute to the longevity and durability of your flooring.
Tackling Irregular Shapes and Obstacles
Rooms aren’t always square or straightforward, and dealing with irregular shapes and obstacles like pipes can be challenging. We’ll discuss advanced strategies for handling these unique situations. Our guidance includes tips and techniques for making precise cuts and adjustments, ensuring your project fits seamlessly around any obstacles, and maintaining the integrity of your flooring project.
Underlayment for Different Flooring Types
Different flooring types come with their unique installation considerations. We’ll provide specific, tailored instructions for installing underlayment under various flooring types, including hardwood, laminate, tile, and more. Each flooring type demands a distinct approach, and our guidance will ensure you’re well-prepared for your specific project, regardless of the material you choose.
Finishing Touches
We’ll summarize the final steps of the underlayment installation process, ensuring you’ve covered all aspects before moving on to the next stage of your flooring project.
After successfully installing underlayment, we’ll offer guidance on what your next steps should be, whether it’s installing the actual flooring or addressing other finishing tasks. Your underlayment is the foundation for a beautiful and durable floor, and we’ll ensure you’re ready for the next phase of your project.


